Wednesday, December 18, 2013

Out and about - Norman Lindsay Gallery and cafe


Norman Lindsay is Australia's (arguably) best-known artist.
He was certainly prolific, and is in it's day his work was very controversial.
His love of the female form was the source of much of his inspiration and he created a wealth of painting, drawings, sculptures and etchings with very bohemian and decadent subjects.
He also wrote - some of his works were banned, but his best know story "The Magic Pudding" is well-known and loved.
Thankfully his home near me in the Blue Mountains has been preserved....and was thankfully saved during the recent bushfires.
There is also a delightful cafe....so many reasons to visit.

Monday, December 16, 2013

Random acts of craftiness - bits of DIY from around the webs.

There are so many creative and generous people on the interwebs and I am in awe of them and the stuff that they produce.

One of my favorite creative peeps has this ultra-sweet tutorial on her blog - grrl+dog.
I could see a whole swag of these being made for all the family.

by grrl+dog
How about some origami christmas trees?
Aren't they tres chic?
First seen posted by my friend Michelle on instagram, but I couldn't follow her link to the instructions, so instead I found this tutorial -

on mylifebox

While on the subject of paper....why not print your own christmas cards (if you haven't already sent them. I know I haven't!)
But, wait, you can use these already designed for you and you ca just doenload them and print them yourself.
How easy is that?
We can thank Delia Creates for them.

by Delia Creates
These are seriously cute -

from cake central
Upside-down gingerbread men become reindeer!
Oh deer!

You know I just love printables, and I marvel at the generosity of people who create FREE printables. They are awesome!

Look at this! Printable gift wrap!
Plus ideas on how to use it - really, there are some swell ideas!

http://mypoppet.com.au/2013/12/printable-gift-wrapping-paper-fun-gift-wrapping-ideas.html
from my poppet
How are all your Christmas preps going?
Er, um, better than mine I hope.

Sunday, December 15, 2013

Where I've been - Narrabeen Lakes christmas market.

This is where I was on Saturday -


At Narrabeen Lakes Christmas Festival.
It's a great location, in the park that runs right next to the lake.


I met some lovely new people who have some gorgeous creations.

The vibrant photography of Maria Vantsos immediately caught my eye, particularly as we seem to have a shared interest in doors and windows, jewel-coloured houses and jewelled oceans - lovely, just lovely.
Maria was still setting up her stall when I lobbed by but you can see more of her work and her newest collection "A little gypsy in my soul" on her website, but be careful viewing of it may cause you to want to travel!


Not far away was Tim Rutten with his wooden candle holders.
I love the natural rustic woodiness of Tim's creations.


Tim is a native of the Northern (Sydney) beaches so you may find him at a market or two up that way.


And look! Here is the lovely Libby Watkins!
Her highly original work instantly attracted my attention.


Libby is an artist and designer who obviously takes a lot of her inspiration from the northern beaches near her home - fins, surf, and oh, the colours!


You can find out more about Libby and her work on her (fabulous) website.


Saturday, December 14, 2013

7 things - yearly planners

I an attempt to be more organised next year I wondered if maybe I need a yearly planner?
OK, I already have a diary and I usually have at least 2 calendars, but a yearly planner has the advantage of being able to look at the bigger picture - indeed looking at the whole year at once.
What do you think?
Do you use a yearly planner?

How about one of these?

This one is nice and clear and has some fun and inspirational quotes on too.
by doodlelove
You gotta love printables!
This looks like a very organised planner - not one one sheet but in one folder.
It could really change your life.

by OrganiseWhimsy
More on the traditional diary lines - but so much smarter.
And I love the photo styling.

by ToodlesNoodles
A great one for you sewing peeps put there!

by designbirdie
So much more than just a yearly planner - cash flow manager, and menu planner as well!
And it comes as a digital down load.
So much convenience.

by ArtyCreativa
Ooooo! Maybe I need this bloggers planner!

by wineandmeeples
Actually this could quite possibly be the most useful on of all!
A declutter planner - yes!

by C3Ldesign

Friday, December 13, 2013

Meet some of my crafty friends

It seems I know a lot of jewellers, so instead of just focusing on one today I'll introduce you to several of my jewels of friends.

I've known Mandy of Beads Me for a few years now. We first met through DUST which is a team of Australian sellers on etsy.
We are almost neighbours as well!
Mandy's range has really expanded over the years - from beadyness, to glass jewellery and now photography.
She is one talented lady.

beach grass pendant by BeadsMe

I'm a huge fan of David Loong's quirky metal pendants.
David is another Blue Mountains resident and used to be a member of the craft co-operative The Nook Leura.
You can still find his work in his etsy shop.

apple core by David Loong

Rachel is the creative behind rmdjewelleryjewellery, .
Rachel's work has also evolved over the years I have known her and I just love her modern silver designs with a splash of colour.

red resin and silver earrings by rmdjewellery

Alison of My Red Scooter is on a journey too!
She has travelled from fabric accessories to her newest venture - colourful resin jewellery.

stacking resin bangles by My Red Scooter

Mel is someone I also met through the DUST team on etsy.
She is one talented lady!
If you have a look at her etsy shop you will see the breadth of her work - and she makes some pretty awesome silver jewellery.

By the Rivers of Babylon bracelet by wiccked
Why don't you go on a little journey and pay them all a visit?
Have a lovely weekend.

Thursday, December 12, 2013

What I've been working on - slightly Christmassy.

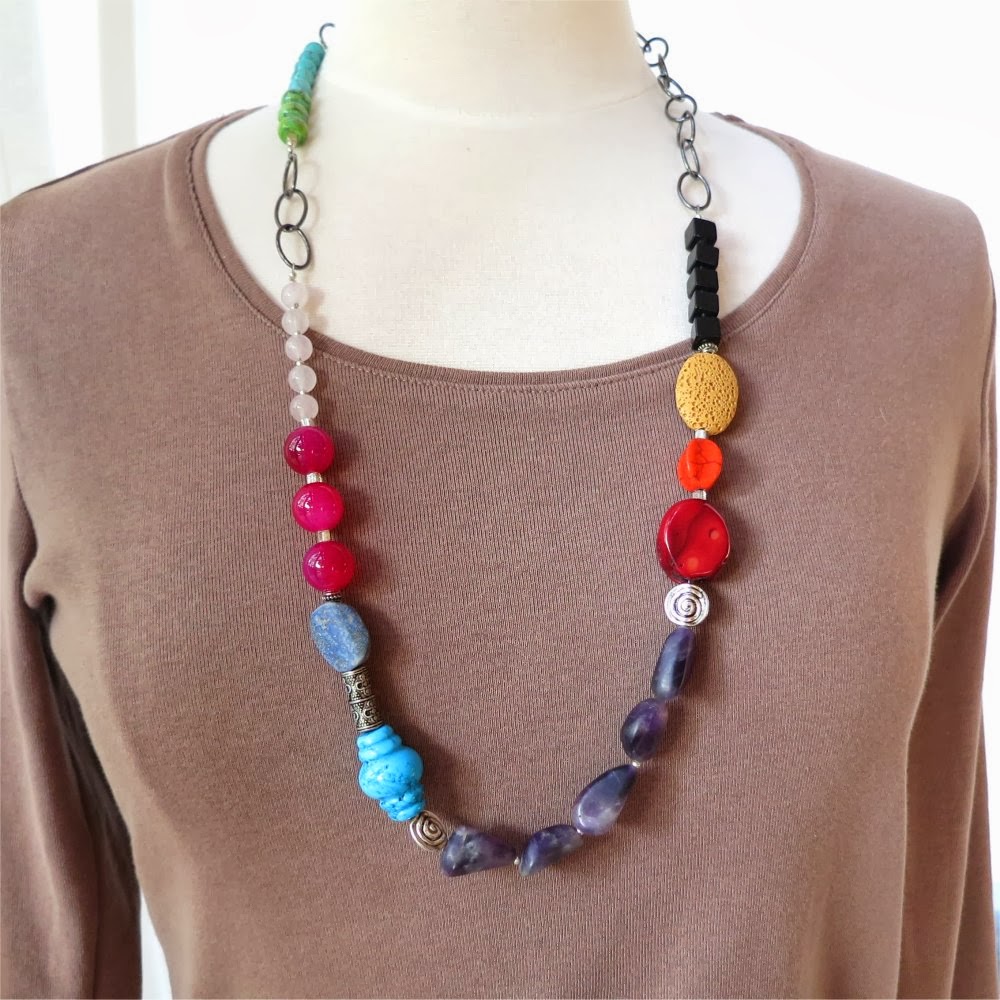
 It wasn't really deliberate, but I accidentally made some slightly Christmassy necklaces.


And then I got over it and went back to normal.

hessonite slabs and blue agate

lapiz slices and blue agate

long ancient treasures necklace

another long ancient treasures necklace

pink moonstone and ceramic beads

Tuesday, December 10, 2013

How to make quiche.


Everyone loves quiche, right?
It is actually easy to make, but then I have a pastry-making gene, as my mum was an ace pastry-maker.
But, honestly how hard can pastry be?
It has 3 ingredients and one of those is water!

So this is how to make quiche - and pastry.

For a roughly 25cm quiche dish you need -
190g plain flour
98g butter or margerine
some cold water, put some water in a jug or cup and add an ice cube.

There are 2 ways to make pastry - the messy, controlled way or the keep-your-hands-clean slightly more chaotic method.

The messy way is the "rubbing in" method.
Put the flour in a bowl and cut the butter (or margerine) up with a knife right in the flour. Keep chopping at it with your knife.
"Hey, that's not messy!"
But wait - here comes the bit where you put your hands into the flour and butter and rub the mixture between your thumb and fingers until "it resembles breadcrumbs" (that's the classic description) or until it the butter has become one with the flour with no big lumps.
Make a bit of a hollow in the middle and pour in a couple of tablespoons of cold water.
Mix in with a knife.
This part is a bit more tricky because the exact amount of water is open to debate.
You want the mixture to come together to form a ball of dough, without being too dry or too soggy.
You might need to add a bit more water and keep stirring like mad with the knife.
When it is all pretty much gathered into a lump, turn it out onto a previously floured work surface and quickly and gently knead it into a ball.
Do not overdo this part as if there is one thing that pastry hates and that is too much massage.
Wrap in glad wrap and pop it in the fridge.

Method 2.
Put flour and butter in food processor.
Whizz.
Add 2 tablespoons of water.
Whizz.
You might need to scrape everything back off the sides of the bowl.
You might have to add a bit more water. Whiz until it kind of all sticks together.
(At this stage I always add too much water and end up with sticky goop).
Then do the dumping out onto the floured bench part...

Heat your oven to 200 C.

Prepare the filling.
I used asparagus.
I steamed the asparagus for 1 minute in the microwave.
I kept 6 or 7 spears and chopped the rest into 2cm lengths.

Beat 4 eggs in a bowl or jug.
Add 1 cup of cream/milk/or a mixture.
I added some dried tarragon as it seems to go nicely with asparagus and seasoned with pepper.
Grate a cup of cheese.

When the oven is heated up you are going to blind- bake the pastry.

Get the pastry out of the fridge and put on your floured surface.
Roll it out with a rolling pin if you have one, with a bottle or glass if you don't, until it becomes a circle just a little bigger that your quiche dish.
Drape it over the rolling pin and lay it on the dish, easing it down into the corners, trying not to stretch it. Pastry doesn't like to be stretched.
It should drape slightly over the edges, yes?
Trim the edge off and keep the trimmings.
If you pastry has cracked or got a hole somewhere, you can patch it with these trimmings. Moisten the pastry with your finger dipped in water and stick the patch to the hole.

Get a big piece of greaseproof paper or baking paper or aluminium foil and line the pastry shell with it.
Next you need some dried beans to weight down the pastry so it doesn't puff up when you bake it.

Pop in the oven for about 20 mins until the pastry looks slightly cooked and the edges just starting to colour.

Take out of the oven and remove the paper and beans.
You can keep the beans in a jar for next time,but you can't use them to make real beans anymore.

Sprinkle a bit of the grated cheese in the pie shell.
Add the asparagus.
Pour eggy mixture over the top.
Sprinkle on rest of cheese.
Lay reserved asparagus spears decoratively on the top.

Cook in oven for about 30 mins until puffed up and browned.

See? It's easy!
Related Posts Plugin for WordPress, Blogger...